 The Anatomy of a Bull Flag
How to Spot Explosive Breakouts Before They Happen
Bull flags are one of those patterns that look obvious in hindsight — “Wow, that was such a clean flag!” — but feel chaotic in real time when candles are whipping up and down.
The traders who consistently nail them aren’t guessing. They understand the anatomy of a bull flag: what the trend should look like before it forms, how the consolidation behaves, and what a real breakout actually looks like on the tape.
1. What Is a Bull Flag (Really)?
A bull flag is a continuation pattern. It’s not just “a pullback.” It’s a period of controlled rest in a strong uptrend — a pause that refreshes before the next leg higher.
It has two core parts:
- The flagpole: A strong, impulsive move up — usually on expanded volume, breaking clear levels, and leaving a trail of higher highs and higher lows.
- The flag: A tight consolidation or pullback that slopes slightly downward or sideways, with contracting volume and no major technical damage to the trend.
2. The 3 Core Pieces of a High-Quality Bull Flag
Before you risk a dollar on any bull flag, make sure these three boxes are checked. If one is missing, the odds drop fast.
-
Strong, clean flagpole:
You want a decisive move up, not a messy grind. Look for:- Clear breakouts over prior resistance (pre-market high, prior day high, major daily level).
- Multiple strong green candles with small wicks.
- Above-average volume during the push.
-
Tight, controlled pullback:
During the flag, the stock should:- Pull back in an orderly way (no huge red panic candles).
- Trade inside a downward or sideways channel.
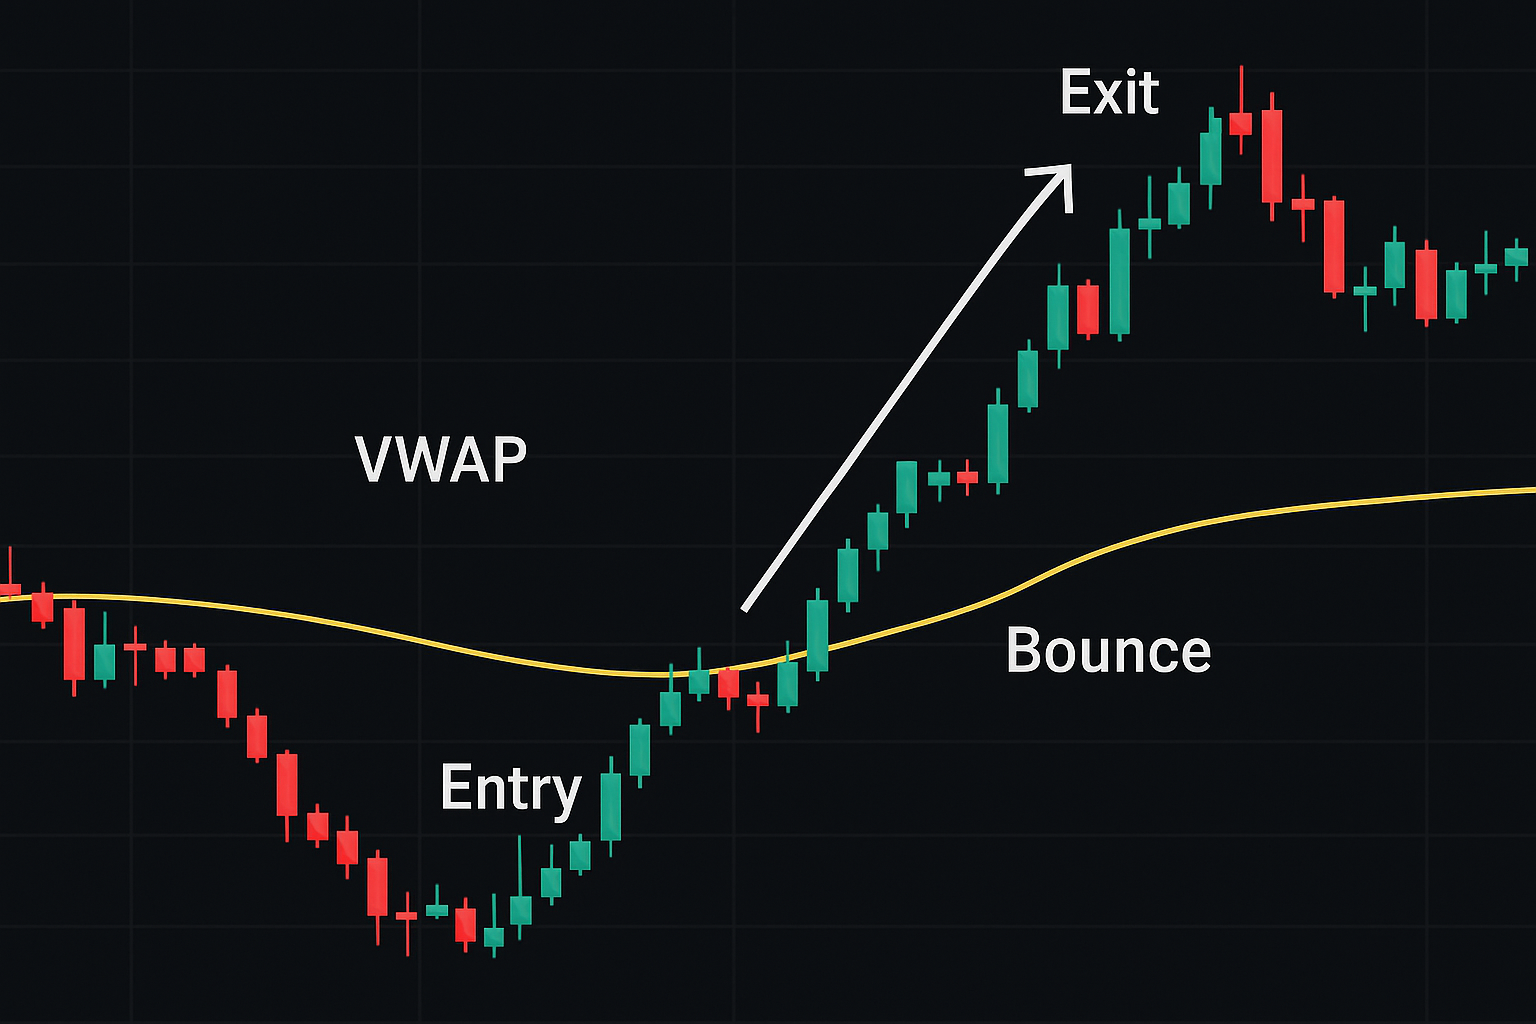
- Hold above key support (VWAP, 9/20 EMA, prior breakout level).
-
Volume contraction:
Volume should decrease during the flag. That tells you the pullback is mostly profit-taking, not aggressive selling.
3. Step-by-Step: How to Spot the Flag Forming in Real Time
Most traders only recognize bull flags after the move is over. Your job is to read it as it develops, without jumping in too early.
Here’s a simple real-time checklist:
-
Step 1 — Identify the runner:
Early in the session, find stocks with:- Strong gap up on news or volume.
- Clean trend up after the open.
- Relative strength vs. the overall market.
-
Step 2 — Mark the flagpole:
Once you see the first strong trend leg, mark:- Low of the move before it started pushing.
- High of the push before it starts consolidating.
-
Step 3 — Watch the pullback:
Price now drifts down or sideways:- Draw a small trendline over the highs of the pullback candles.
- Make sure lows are not breaking major support.
- Confirm volume is lighter than the flagpole move.
-
Step 4 — Wait for the squeeze zone:
The tighter the range gets under your flag trendline, the closer you are to a potential breakout.
4. Entries, Stops, and Targets: Making the Bull Flag Tradable
A pretty pattern is useless if you don’t have clear rules for where to get in, where to get out, and what you’re aiming for.
-
Entry trigger:
A common approach is:- Enter on a break above the flag trendline and the high of the breakout candle.
- Optional: wait for confirmation with increased volume versus prior flag candles.
-
Stop loss:
Logical stops are usually:- Below the low of the flag.
- Or below the most recent higher low within the flag.
-
Targets:
Two common methods:- Measured move: Project the height of the flagpole from the breakout point.
- Key levels: Prior daily resistance, whole/half dollar levels, pre-market highs.
Many traders scale out: take partial profits at the first target, then trail a stop on the rest using EMAs or recent swing lows.
5. Common Bull Flag Mistakes That Blow Up Good Ideas
Most failed bull flags weren’t actually bull flags. They were forced trades, misread trends, or FOMO chases.
Watch out for these:
- Chasing extended moves: If the stock has already formed multiple flags and you’re late in the move, odds of failure are higher.
- Confusing chop for a flag: Wide, ugly candles with big wicks and random volume spikes are usually just noise, not a clean pattern.
- Ignoring bigger timeframes: A bull flag on the 1-minute chart that’s slamming into a major daily resistance might be nothing but a short trap.
- Entering inside the flag: Jumping in before a real breakout, then getting shaken out repeatedly as price drifts.
6. A Simple Bull Flag Playbook You Can Reuse Every Day
Turn bull flags from a “nice idea” into a repeatable play by turning everything into a checklist you can follow in real time.
-
Pre-market:
- Scan for gappers with news and strong volume.
- Mark pre-market high/low and major daily levels.
-
After the open:
- Watch for stocks proving strength — clean trend up, holding above VWAP.
- Identify the first strong leg (your potential flagpole).
-
Flag formation:
- Draw your flag trendline over pullback highs.
- Confirm volume is lighter on the pullback than on the push.
- Check that key support (VWAP/EMA) is holding.
-
Execution:
- Set alert slightly above the flag trendline.
- Enter on breakout with predefined share size.
- Place your stop under the flag low or recent higher low.
- Set target(s) using measured move and key levels.
-
Post-trade:
- Screenshot the chart.
- Note: Was the flag clean? Did volume confirm? Did you follow your rules?
Final Thoughts: Bull Flags Reward Patience, Not Prediction
The anatomy of a bull flag isn’t complicated — strong move up, controlled rest, explosive continuation. But the discipline to wait for all three pieces is what separates professional setups from random entries.
If you’re willing to pass on the messy, low-quality flags and only focus on the clean ones — with a clear plan for entries, stops, and targets — bull flags can become one of the most reliable tools in your trading playbook.
You don’t need to catch every breakout. You just need to consistently execute your best A+ patterns. Bull flags, traded with structure, can absolutely be one of them.
📘 The Anatomy of Bull Flag Trading Strategies
In The Anatomy of Bull Flag Trading Strategies, I break down real chart examples, entry and exit rules, risk templates, and journaling prompts — so you can go from “I kind of see it” to consistently trading bull flags with confidence.